

Updated on
Quick Answer:
You can use QuickTime audio recording to capture microphone sound on Mac directly. If you need to record computer audio with QuickTime, you need an extra audio driver, such as BlackHole or Soundflower, to help.
Table of contents
Does QuickTime Record Audio
Yes, QuickTime Player does help to record audio on Mac and will save the audio file in M4A format. However, it can only record microphone sound on Mac by default since Mac doesn’t have the built-in feature to capture audio playing on the computer. However, by adding a virtual audio driver on your Mac, you will be able to record internal audio on Mac with QuickTime, too.
If you want to know more about QuickTime audio recording, read on to get the details on how to record system sound or microphone audio on your Mac with QuickTime.
QuickTime Audio Recording: Record Microphone Sound
As mentioned above, QuickTime can record audio from the microphone or other external audio sources by default. If you are going to record your voice on Mac, you can use QuickTime to get it done directly.
QuickTime audio recording steps:
Step 1. Open QuickTime Player on your Mac.
Step 2. Go to File > New Audio Recording.
Step 3. Click the Options button (the arrow icon) and choose the microphone you’d like to use.
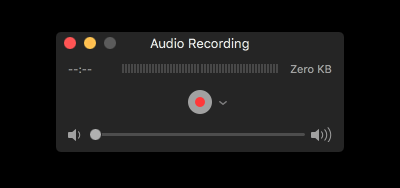
Step 4. When you are ready for the recording, click Record.
Step 5. Click the recording icon in the menu bar to end the recording when needed.
Step 6. Save the audio file.
QuickTime Audio Recording: Record Internal Audio
If you want to record internal audio on your Mac with QuickTime, it’s necessary to add an extra audio driver, such as BlackHole Virtual Audio Driver on your Mac. Afterward, you need to set it up manually so that you can use BlackHole as the audio output device to capture computer audio on your Mac.
Step 1. Download and install BlackHole on your Mac.
Step 2. Open Audio MIDI Setup on your computer and click the plus icon to create a new multi-output device.
Step 3. Choose the newly added item and check these options: BlackHole and your Mac’s speakers or the built-in output.
Step 4. Also, check Drift Correction next to these options.
Step 5. Open QuickTime Player and go to File > New Audio Recording.
Step 6. Click the arrow icon and choose BlackHole as the recording device.
Step 7. Click Record to start recording computer audio on your Mac.
Step 8. When you are done, end the recording and save it to your Mac.
Pros and Cons of QuickTime Audio Recording
As you can see from the information above, there are both advantages and disadvantages of using QuickTime to record audio on Mac:
Pros:
- Built-in app on Mac
- Free to use
- Supports audio recording
Cons:
- Requires an extra app to help record internal audio
- Can’t record internal & external audio at the same time
- Only saves audio recordings as M4A
Wrapping Up
While QuickTime Player is capable of recording audio on Mac, it is not the only option available, nor is it necessarily the best choice. If you’re seeking more flexibility when it comes to audio recording on your computer, it is advisable to explore third-party audio recorders such as SurFlex Screen Recorder. These tools offer a range of audio recording modes and support various audio formats. Whether you need to record internal audio on Mac or capture audio in MP3 format, they can accomplish these tasks effortlessly and without any hassle.
About the Author
You May Also Like
-
4 Ways to Record WAV File on Mac
If you are looking to record WAV file on Mac, read this guide and you will get four proven ways to get it done.
Myra Xian Updated on -
How to Record Internal Audio on Windows 10 | 4 Proven Ways
If you want to know how to record internal audio on Windows 10, check this guide and you will get the easy answer.
Myra Xian Updated on -
4 Ways to Record Audio from Website
You can record audio from website easily and save it in any format you prefer. Check this guide to get the detailed tips.
Myra Xian Updated on