

Updated on
Quick Answer:
If you want to record a TeamSpeak video with OBS, you can select the app as the recording source and then record a video directly. If you want to capture audio only, you need to record a video that contains the audio source first and then convert the video to audio.
Table of contents
Can You Use OBS to Record TeamSpeak Audio
Yes, you can easily record TeamSpeak audio with OBS Studio. However, you can’t solely record audio and save the recording in an audio format. That’s because OBS Studio works to capture videos by default. Even if you disselect any video recording source, OBS will save the recording in a video format. Therefore, although you can record TeamSpeak audio using OBS, you’ll need to extract the audio file from the recorded video if you only want to keep the audio file. If you don’t mind, follow the steps below to learn how to record TeamSpeak with OBS.
Note: If you wish to capture TeamSpeak audio only, it’s advisable to record TeamSpeak with Audacity.
How to Record TeamSpeak with OBS
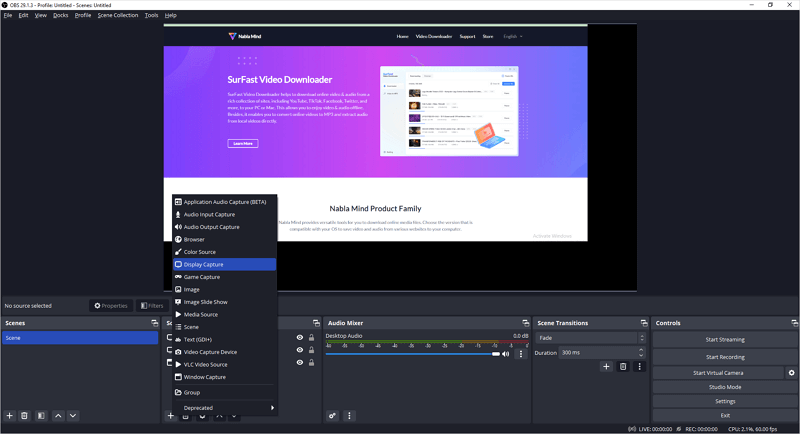
It’s easy to record TeamSpeak with OBS, as long as you add the recording sources properly. Depending on the audio type you want to capture, the audio recording options you need to add vary. For example, you can use Application Audio Capture to record TeamSpeak audio only, use Audio Output Capture to capture internal audio, and Audio Input Capture to record microphone sound. Of course, you can add multiple audio recording sources to capture all types of sounds you need. Specify your needs and follow the steps below to record TeamSpeak with OBS:
Step 1. Launch OBS Studio on your computer.
Step 2. Go to File > Settings > Output to set up the output settings.
Step 3. Save your changes and go to the Sources panel.
Step 4. Click the plus icon to add Application Audio Capture and click OK.
Step 5. Select TeamSpeak and click OK.
Step 6. Continue adding other recording sources you need.
Step 7. When you are ready, click Start Recording in the Controls panel.
Step 8. After you capture the content you need, click Stop Recording.
Step 9. Go to File > Show Recordings to check the recording.
You can refer to the guide on how to record with OBS for more details.
Extract TeamSpeak Audio from the Recording (Optional)
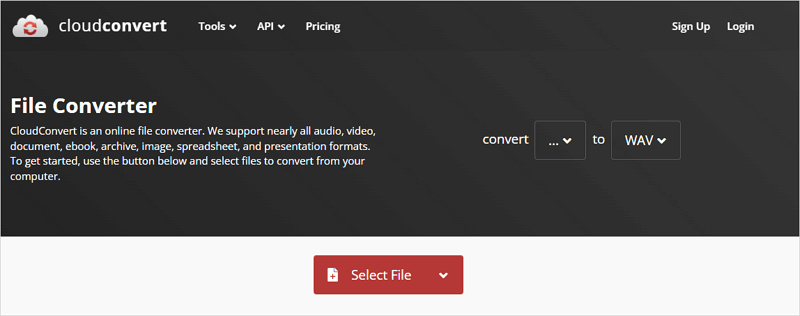
As mentioned earlier, if you only want to keep the audio file, you need to further convert the video recording to an audio file. To do so, you can use CloudConvert, an online file converter.
To extract TeamSpeak audio:
Step 1. Open a browser and visit CloudConvert.
Step 2. Click Select File and upload the OBS recording.
Step 3. Select the audio output format you prefer and click Convert.
Step 4. After the conversion, click Download to save the audio file to your computer.
The conversion process is also necessary when you want to record Skype audio with OBS or capture Discord audio with OBS.
Wrapping Up
In addition to OBS Studio, there are other audio recorders or screen recorders available for recording TeamSpeak, such as Audacity, Bandicam, SurFlex Online Free Screen Recorder (no watermark or time limit), and more. You can also use any of them to capture your desired video or audio.
About the Author
You May Also Like
-
Windows Screen Record Shortcut: Windows + Alt + R and More
Check how to record screen on Windows with Windows screen recorder shortcut in different types, including Windows-Alt-R and more.
Myra Xian Updated on -
How to Screen Record on Razer Laptop in Windows 11, 10, and More
You will know how to screen record on Razer laptop using 4 easy and tested screen recorder tools, including Razer Cortex.
Myra Xian Updated on -
How to Screen Record on Discord on Any Device
You will know how to screen record on Discord no matter which device you use and no matter which type of tool you prefer.
Myra Xian Updated on