

Updated on
Quick Answer:
You can screen record PC using:
1. Snipping Tool
2. Xbox Game Bar
3. Steps Recorder
4. SurFlex Screen Recorder
5. ScreenCapture
Learning how to screen record on Windows is of great help for you to create tutorials, demonstrations, and more. Thus, if you need to capture video and audio on your computer but don’t know how to do it, check this guide to learn how to screen record on PC. Whether you are using the latest Windows 11 or earlier Windows 7, you will know how to record computer screen using different types of screen recorder tools or services.
Table of contents
How to Screen Record on Computer in Windows 11
If you are using Windows 11, you don’t necessarily need to download a third-party screen recorder to capture your computer screen since there are pre-installed apps with screen recording features on the latest Windows version. One of the built-in screen recorder apps is Snipping Tool, which allows you to record full screen or a part of the screen on Windows.
However, it can’t screen record on Windows 11 with audio, making itself a less popular choice for Windows screen recording. If the Snipping Tool screen record can’t meet your needs, try the alternatives below.
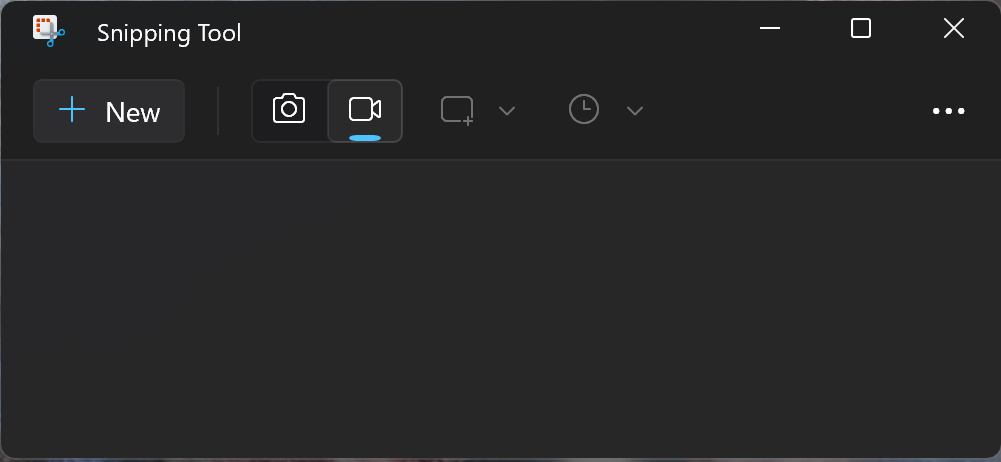
To screen record on computer via Snipping Tool:
Step 1. Press Windows + Shift + S on your keyboard to launch Snipping Tool.
Step 2. Click the video icon to switch to Record mode.
Step 3. Click New, select the target area, and then click Start.
Step 4. Click Stop in the control bar to end the recording and then save it to your computer.
How to Screen Record on PC in Windows 10
Also applies to Windows 11
Another native screen recorder app on Windows 11, Xbox Game Bar, which is also available in Windows 10, allows you to screen record on Windows 10 or Windows 11 with audio easily for free.
Xbox Game Bar screen recording helps to screen record PC with both internal and external audio. However, it can only record the active window of a game or an app (except for File Explorer). That means you can’t record your computer desktop or a selected portion of your screen. Thus, check your specific need before you try this computer screen recorder.
To screen record on PC in Windows 10:
Step 1. Make sure the window you want to record is active.
Step 2. Press Windows + Alt + R to start recording right now or press Windows + G to open Xbox Game Bar and click Start Recording in the Capture panel.
Step 3. When you need to stop, click the Stop icon in the control bar or press Windows + Alt + R again.
Step 4. Click the Game clip recorded message to check the recording.
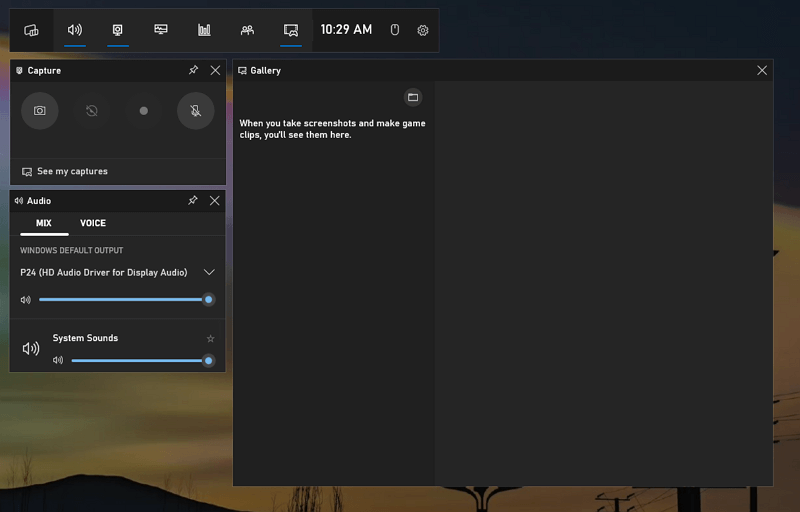
If you want to find the recordings on your computer, go to C:\Users\admin\Videos\Captures.
How to Screen Record on Windows 8 & 7
While if you are using earlier Windows 8 or Windows 7, the built-in PC screen recorder for you is (Problem) Steps Recorder. It allows you to record screen with audio on Windows for free. However, it has quite limited functionality such as it can only save the recording as the MHTML file and lack customizable options. Thus, you are recommended to screen record on Windows using a third-party screen recorder such as Bandicam, Movavi Screen Recorder, Snagit, and ScreenCapture.
To screen record on Windows:
Step 1. Click Start and go to Accessories > Problem Steps Recorder.
Step 2. Click Start Record to start recording your computer screen.
Step 3. Go through the steps you want to record.
Step 4. Click Stop Record to end the recording.
Step 5. Save the recording as a ZIP file on your Windows PC or laptop.

How to Record Your Screen on All Windows Versions
Although each version of the Windows operating system comes with its built-in PC screen recorder, as you can see, they all have certain limitations that make them unsuitable for many screen recording scenarios.
Therefore, you might still need a professional third-party screen recorder for recording your computer screen. In that case, I recommend using SurFlex Screen Recorder, a Windows screen recorder that is suitable for all screen recording situations and is compatible with all Windows versions. Whether you want to record the entire screen or just a specific part on Windows 10, or if you need to record a game or an application, you can do so effortlessly using this versatile tool.
What’s more, when you record your PC screen, you can customize the video format, video quality, and more, enabling you to get a recording that perfectly fits your needs.
To record PC screen:
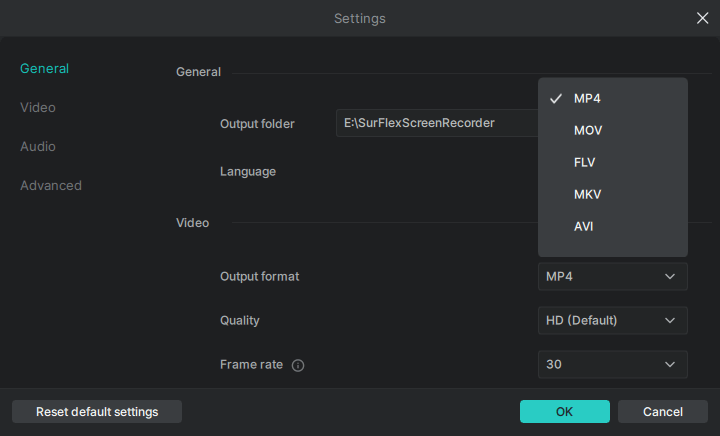
Step 1. Open SurFlex Screen Recorder on your PC and then click the Settings icon.
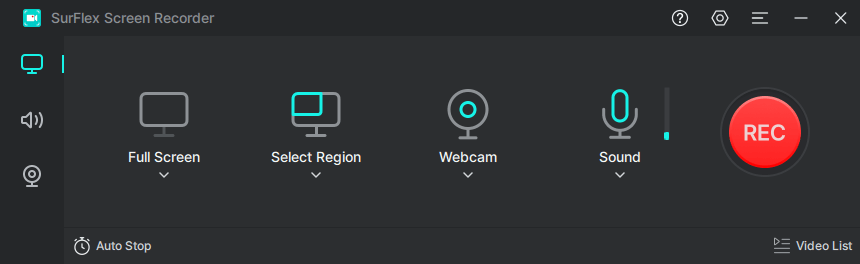
Step 2. Select the output options and then click OK.
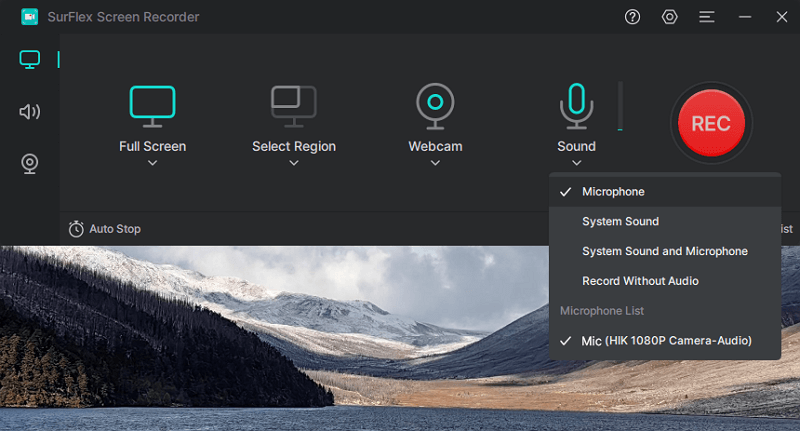
Step 3. If you need to record a video on your computer with audio, enable audio recording and select the audio type you need.
Step 4. Choose to record the whole screen or a selected portion.
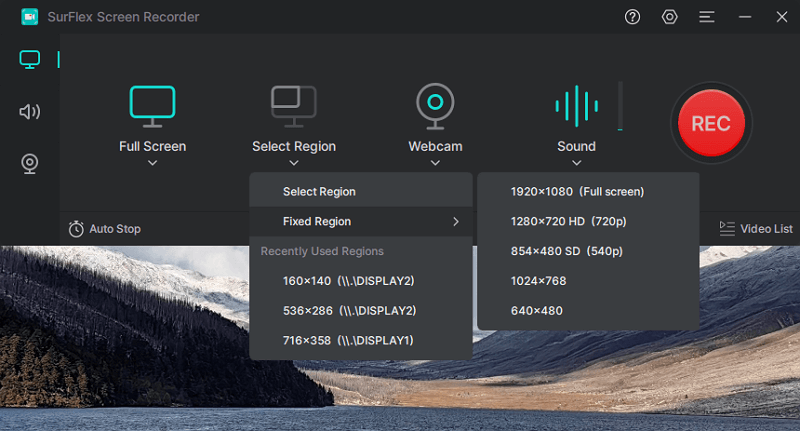
Step 5. Choose the target recording region and click REC to start recording your PC screen.

How to Screen Record on PC with Audio Online
Another type of screen recorder that is compatible with all Windows versions is online screen recorder services. An online screen recorder like ScreenCapture allows you to record a browser tab, a window, or the entire screen on your computer, either with or without audio. You can also record your screen with a webcam using this site. Afterward, you can save the recording as an MP4 file in HD quality. (The free version will add a watermark to your recording by default.)
If you prefer such a solution, follow the steps below to learn how to record computer screen without any software.
To screen record on PC online:
Step 1. Prepare the tab, window, or screen you’d like to record.
Step 2. Go to ScreenCapture.com, set up the webcam and audio input, and then click Start Recording.
Step 3. Select the tab, window, or full screen to record and click Share.
Step 4. When you are done, click Stop Sharing and go back to ScreenCapture.
Step 5. You may need to click Stop Recording here, depending on your recording mode.
Step 6. Preview the video and click Download to save it to your computer.

Wrapping Up
If you command these tips, you will be able to capture everything you want on your Windows PC or laptop. In addition to desktop apps and online services, there is one more type of screen recorder for you: browser extensions. If you are interested in this method, there are browser extensions worth trying to screen record PC:
- Awesome Screenshot & Screen Recorder
- Loom Screen Recorder & Screen Capture
- Nimbus Screenshot & Screen Video Recorder
About the Author
You May Also Like
-
How to Record TikToks on PC in 3 Ways
You will know how to record TikToks on PC using easy screen recorders to create high-quality videos for sharing.
Myra Xian Updated on -
4 Ways: How to Record Video on Windows 11
You will know how to record video on Windows 11 using different types of video recorders. Pick up the one you like to apply.
Myra Xian Updated on -
How to Screen Record on Acer Laptop in 4 Ways
You will know how to screen record on Acer laptop either with built-in screen recording feature or third-party Acer sceen recorder apps.
Myra Xian Updated on