

Updated on
Quick Answer:
If you don’t know how to screen record on Chromebook, using one of the tools below:
1. Screen Capture
2. Screencast
3. Awesome Screenshot & Screen Recorder
4. Nimbus Screenshot & Screen Video Recorder
Just as you screen record Windows or record screen on Mac, there are both built-in screen recorder apps and third-party screen recording tools to help when you need to screen record on Chromebook.
If you want to know how to screen record on Chromebook, either with or without audio, check the 4 methods below and pick up the way you like to record your screen on Chromebook with ease.
Table of contents
How to Screen Record on Chromebook with Screen Capture
Screen Capture is the built-in app on ChromeOS that allows to you take screenshots and record screen on Chromebook. When it comes to screen recording on Chromebook, it enables you to capture the full screen, the partial screen, or a specific window. While screen recording on Chromebook using Screen Capture, you can turn on the microphone so that you can screen record Chromebook with audio.
As for the recorded videos, Screen Capture will save them as .webm files and store them in the Downloads folder.
To screen record on Chromebook with Screen Capture:
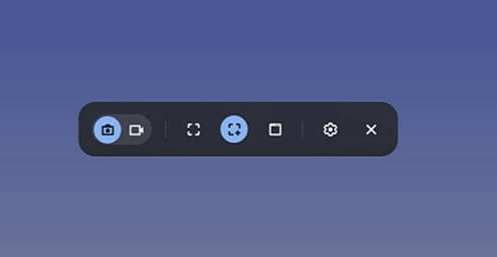
Step 1. Press Shift + Control + Show Windows (a rectangle with two lines on the right) to launch the Screen Capture toolbar.
Step 2. Click the video icon to switch to the screen recording mode.
Step 3. Click the Settings icon to set up the audio input, camera, and storage path.
Step 4. Select a recording mode, full screen, partial screen, or window, and click Record to start recording your Chromebook.
Step 5. To stop screen recording on Chromebook, click the Stop icon in the taskbar.
Step 6. Click the Screen recording taken notification to check and view the recorded video.
Notes: You can also access Screen Capture by following these steps: Click on the clock on your Chromebook, click the arrow to expand more options, and then choose Screen Capture.
How to Screen Record on a Chromebook with Screencast
Screencast is another native screen recorder on ChromeOS that can help you record your screen on Chromebook easily. It also works to record the full screen, the partial screen, or a window on your Chromebook with audio. But there are still differences between Screen Capture and Screencast:
- Screencast allows real-time drawing while Screen Capture doesn’t.
- Screencast supports voice-to-text conversion while Screen Capture doesn’t.
- Screencast saves recordings to the cloud but Screen Capture stores recorded videos locally.
Pick up a suitable way according to your needs.
To screen record on a Chromebook via Screencast:
Step 1. Open the App Drawer and click Screencast.
Step 2. Click New Screencast and select a recording mode.
Step 3. Click the red recording icon on the taskbar to start the recording.
Step 4. During the recording, click the pen icon to add annotations if needed.
Step 5. When you need to stop the Chromebook screen recording, click the red Stop icon from the taskbar.
Step 6. You can preview the recording in the Screencast app and then share it with others via its link.
How to Screen Record on Chromebook with Audio
As you can see from the details above, both Screen Capture and Screencast can only capture the microphone sound. If you need to screen record on Chromebook with internal audio or both internal & external audio, using a screen recorder chrome extension like Awesome Screenshot & Recorder is a better choice.
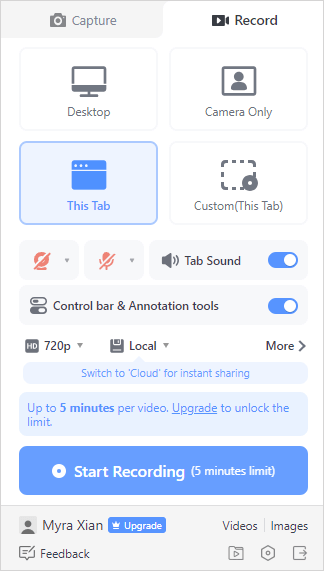
It provides various screen recording modes: Desktop, Camera, Browser Tab, and Custome region, allowing you to capture whatever you want. As for audio, it supports both system sound and microphone sound, making it easy for you to screen record on Chromebook with audio.
To screen record on Chromebook with audio:
Step 1. Add Awesome Screenshot & Recorder to your Chrome and sign in.
Step 2. Select a recording mode and set up the recording preferences.
Step 3. Click Start Recording and select the recording tab or area if needed.
Step 4. To stop the recording, click the Awesome Screenshot & Recorder icon and then click Stop.
How to Record Screen on Chromebook Easily
Awesome Screenshot & Recorder is not the only screen recorder for Chromebook. Another pick for a Chromebook screen recorder is Nimbus Screenshot & Screen Video Recorder. It also has powerful screen recording features and enables you to record your screen on Chromebook and add markups or annotations during the recording.
If you are an experienced video editor and want a screen recorder for Chromebook with more advanced features, Nimbus is a better option.
Notes: The free version provided limited functionality. It’s advisable to upgrade to enjoy unlimited features.
To record your screen with Nimbus Screenshot & Screen Video Recorder:
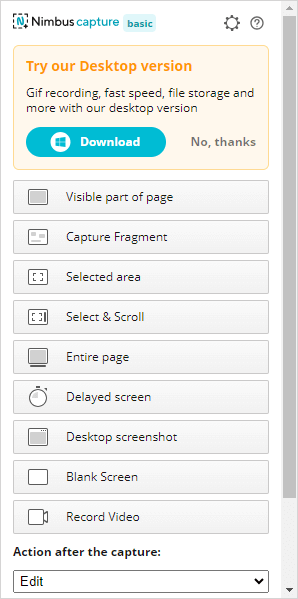
Step 1. Add the screen recording extension to your browser.
Step 2. Click the icon of the screen recorder and choose Record Video.
Step 3. Set up the recording settings, select the target recording source, and click Start Record.
Where to Find the Screen Recording on Chromebook
When you take screen recordings on a Chromebook, they are automatically saved to your clipboard, allowing you to copy and paste them into other applications or programs. However, you can also locate your recordings in the Downloads folder. To access this folder, open the Files app from the app launcher and select the Downloads folder from the sidebar.
On the other hand, recordings made with Screencast are not stored locally but in the cloud instead. You can access them through the Screencast app whenever you desire.
Screen Record on Chromebook: More Tips
When you screen record on a Chromebook, you may also want to know:
Does Chromebook have a screen recorder?
The built-in screen recorder for Chromebook includes Screen Capture and Screencast. With them, you will be able to screen record on Chromebook with sound.
How to stop screen recording on Chromebook?
The Stop button is available on your Chromebook’s taskbar. You can click the Stop sign to stop screen recording on your Chromebook whenever you need to.
How to take a screenshot on Chromebook?
There are ways to take a screenshot on Chromebook:
- Press the Screenshot key.
- Press Shift + Ctrl + Show windows.
- Press Ctrl + Shift + F5.
Wrapping Up
In addition to the native screen recorder apps, you can also use browser extensions to record the screen of your Chromebook. If you only need to occasionally record your screen without specific requirements, using the built-in tools in ChromeOS is sufficient. However, if you frequently need to record your screen for creating instructional videos, demonstration videos, or other purposes, using a third-party screen recorder for Chromebook is necessary.
About the Author
You May Also Like
-
5 Ways to Record GIF on Windows 10 or Windows 11
Whether you are using Windows 10 or Windows 11, you will know how to record GIF on Windows with five easy tips.
Myra Xian Updated on -
How to Record Entire Screen on Windows 10 in 2025
You will know how to record entire screen on Windows 10 via 5 easy and testest ways. Pick up the one you like to record full screen easily.
Myra Xian Updated on -
How to Screen Record on Windows 8 or Windows 8.1
You will know how to record screen on Windows 8 & 8.1 using the built-in screen recorder and third-party screen recorder for Windows 8.
Myra Xian Updated on