

Updated on
Quick Answer:
You can record a PowerPoint presentation on Mac using PowerPoint‘s slide recording feature, QuickTime Player on Mac, and a third-party Mac screen recorder like SurFlex Screen Recorder (easy and reliable).
Recording a PowerPoint presentation on a Mac is not as challenging as you might think, thanks to the availability of various presentation recording tools.
Firstly, Microsoft PowerPoint itself offers a built-in slide show recording feature that allows you to record a presentation on Mac without the need for additional software.
Additionally, the Mac operating system has a built-in screen recorder, such as QuickTime Player, which can be utilized to record a PowerPoint presentation.
Furthermore, numerous third-party screen recording applications for Mac are available and can assist in easily recording PowerPoint presentations.
With these options, you can effortlessly screen record on Mac, including audio and webcam, ensuring that you capture all the important elements you desire. If you want to know how to record a presentation on Mac, check the three tips below and you will get the answers.
Table of contents
How to Record a Presentation on Mac in PowerPoint
As mentioned earlier, Microsoft PowerPoint has a built-in slide show recording feature that allows you to record a presentation on Mac directly. This function enables you to capture annotation, narration, animation, and webcam during the recording, making it easy for you to capture everything you want. To ensure you can record a PowerPoint presentation with audio and video on Mac successfully, you need to make sure you have allowed PowerPoint to access your camera and microphone when prompted.
To record a presentation on Mac in PowerPoint:
Step 1. Open the presentation you’d like to record.
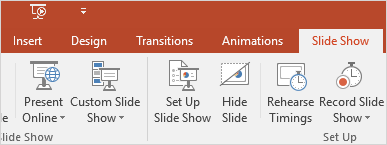
Step 2. Click Slide Show > Record Slide Show.
Step 3. Set up the camera and microphone settings according to your preferences.
Step 4. Click Record to start the presentation recording on Mac.
Step 5. When you need to stop, click the Stop button in the control bar.
Step 6. Export the recording as a video.
How to Record Presentation on Mac with Audio via QuickTime Player
The screen recording features in QuickTime Player include movie recording (record a video of yourself on Mac), audio recording, and screen recording. With the screen recording feature, you will be able to record a presentation on Mac with audio easily for free.
If you want to know more about the recording features in QuickTime, go to the guide on QuickTime screen recording with audio for reference.
Step 1. Prepare the presentation you’d like to record and open QuickTime Player.
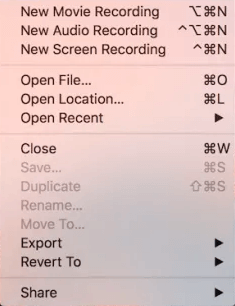
Step 2. Go to File > New Screen Recording.
Step 3. Select Record Entire Screen or Record Selected Portion according to your needs.
Step 4. Click Options and select the microphone you need.
Step 5. Click Record to start recording a presentation audio audio on your Mac.
Step 6. When you are done, click the Stop button in the middle of the screen or use Command + Control + Escape.
Step 7. Save the recording to your Mac.
How to Record a PowerPoint Presentation with Audio and Video on Mac
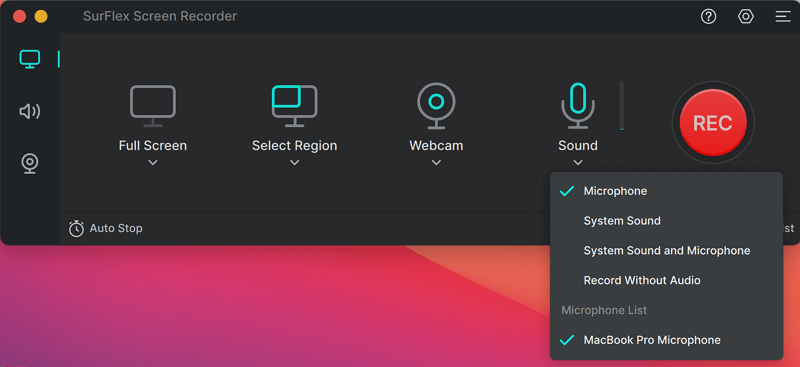
If you want an easy yet powerful way to record a presentation on PowerPoint, using a third-party screen recorder like SurFlex Screen Recorder is advisable. It works to record the computer desktop, any selected portion, a window, an app, and more, either with or without audio.
When you want to record yourself presenting a PowerPoint, this screen recording app will be quite helpful since it can record a PowerPoint presentation and webcam at the same time. As for audio, you can choose to record the presentation with system sound, microphone sound, or both.
In a word, SurFlex Screen Recorder enables you to capture whatever you want. If you not only need to record a PowerPoint presentation but also want to record screen on Mac in many other situations, using such an app may be a preferred choice.
To record a PowerPoint presentation with audio and video on Mac:
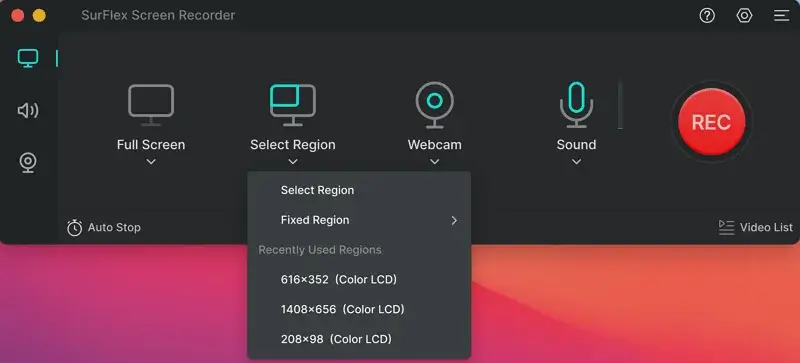
Step 1. Go to Settings to set up your recording preferences and choose the Record Screen mode. Click Select Region and click on the presentation to choose the PowerPoint Window.
Step 2. Enable Webcam recording, select the camera, and choose a resolution. (The supported resolutions depend on the camera you use.)
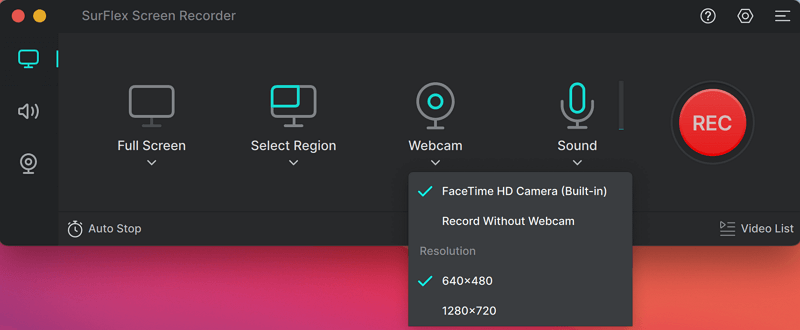
Step 3. Enable audio recording and choose the audio type. Afterward, click REC to start recording the screen and webcam on Mac at the same time.
Wrapping Up
There are also web-based screen recorders that are helpful to record a PowerPoint presentation on your Mac. For example, you can record screen on Mac using an online screen recorder such as:
- ScreenCapture
- RecordCast
- ScreenApp
- Panopto
Or a screen recording browser extension such as:
- Awesome Screenshot & Screen Recorder
- Loom Screen Recorder & Screen Capture
- Nimbus Screenshot & Screen Video Recorder
About the Author
You May Also Like
-
How to Record Yourself on Google Slides | 3 Ways
Check the tips below and you will know how to record youself on Google Slides using different types of screen recorders.
Myra Xian Updated on -
4 Easy Ways to Record Video in PowerPoint You Will Like
You will know how to record video on PowerPoint, either with or without audio and webcam, using 4 easy tips.
Myra Xian Updated on -
3 Ways: How to Record PowerPoint Presentation with Audio and Video
You will know how to record PowerPoint presentation with audio and video on your Mac or PC, either with or without software.
Myra Xian Updated on