

Updated on
Quick Answer:
You can record PowerPoint presentations with audio and video easily using Microsoft Office (built-in feature), SurFlex Screen Recorder (rich recording modes), or ScreenCapture (online).
If you want to video record yourself presenting a PowerPoint, you can record PowerPoint presentation with webcam at the same time to get it done. If you want to do it but don’t know how to record PowerPoint presentation with audio and video, check this guide and follow the detailed steps to record a presentation according to your needs on your Mac or PC without difficulty.
Table of contents
Record PowerPoint Presentation with Audio and Video Directly
Tool: Microsoft Office
Given the huge need for presentation video recording, Microsoft itself has developed and added the presentation recording feature to Microsoft Office. This feature enables you to record a PowerPoint presentation with audio and video directly from the software itself. (You can also choose to record PowerPoint with audio only.) Therefore, you can record a presentation with video easily without installing additional software on your computer, be it Mac or PC.
Make sure the microphone and webcam work properly on your computer, then follow the steps below to record PowerPoint according to your needs.
To record PowerPoint presentation with audio and video directly:
Step 1. Open the PowerPoint presentation you’d like to record.
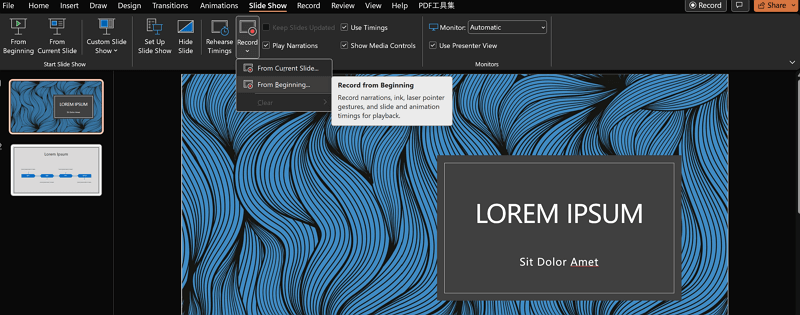
Step 2. Go to Record (or Slide Show), click the arrow under Record, and choose From Beginning or From Current Slide.
Step 3. In the recording window, make sure you have enabled the microphone and camera.
Step 4. Click Record to start recording your presentation with annotation, narration, and animation.
Step 5. Click Stop when you finish the recording and then close the recording window.
Step 6. Go back to your presentation and choose Record > Export to Video.
Step 7. Check the export settings and click Create Video.
Step 8. Select a storage folder and rename the file. Afterward, click Save.
Record a PowerPoint Presentation with Audio and Video Easily
Tool: SurFlex Screen Recorder
Do you want a simpler way to record your presentation with video? If you do, using a third-party screen recorder like SurFlex Screen Recorder will be helpful. It provides rich screen recording modes for you to capture a presentation, a meeting, a streaming video, and more on your computer.
In addition to your screen activities, this screen recorder is capable of recording a camera that is built-in on your computer or connected to your device. Therefore, you can use it to record a PowerPoint presentation with audio and video easily on your Mac or PC.
It’s worth mentioning that, unlike Microsoft Office which only saves the recorded presentation video in the MP4 format, SurFlex Screen Recorder enables you to choose a video format you like, including MP4, AVI, FLV, and more. In a word, if you want to record PowerPoint as video in a more flexible way, using this video recorder is a better choice.
To record a PowerPoint presentation with audio and video via SurFlex Screen Recorder:
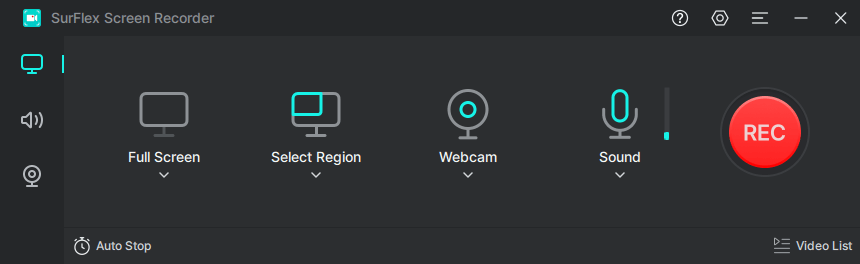
Step 1. Launch the screen recorder on your computer and click Settings to customize the output settings.
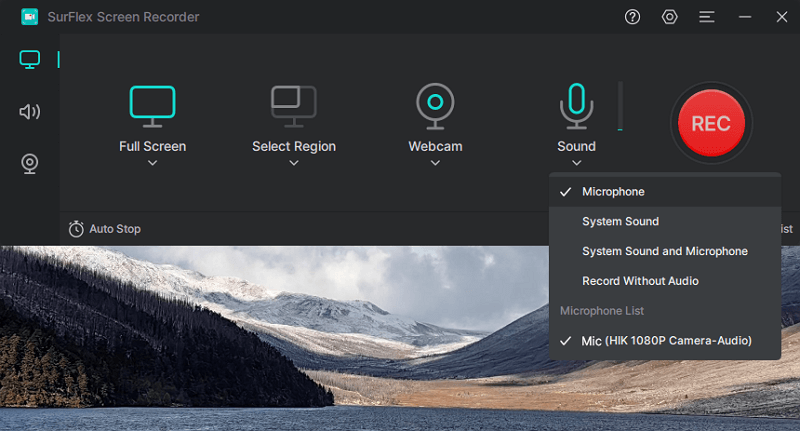
Step 2. To record a PowerPoint presentation with audio, enable audio recording and choose the audio type you need.
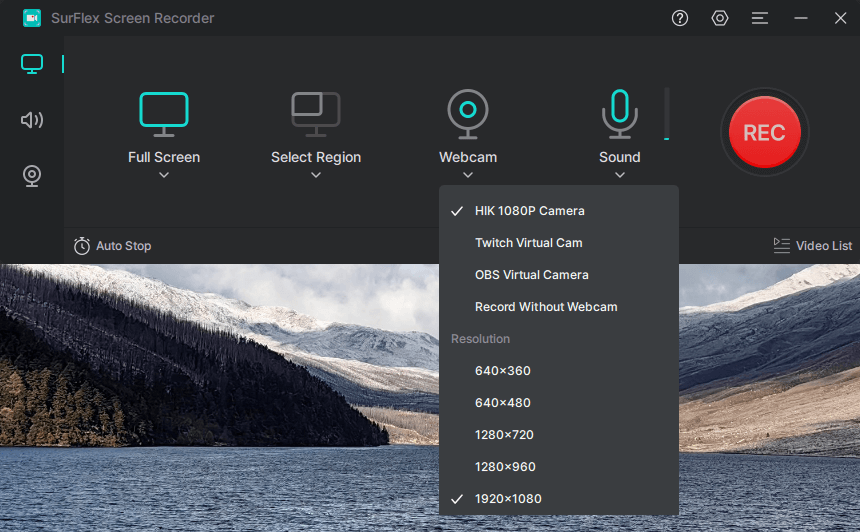
Step 3. If you want to record yourself presenting a PowerPoint, enable Webcam recording, choose the camera you’d like to use, and then select the video resolution.
Step 4. Select to record the full screen or a selected region, choose your PowerPoint window, and adjust the size and position of the camera window. When you are ready, click REC.

Step 5. Once the presentation recording is finished, click Stop and check the video in the popup window.

Record Presentation with Video Online
Tool: ScreenCapture Online Screen Recorder
How to record PowerPoint presentation with audio and video without any software? If you don’t want to install third-party apps to occupy your computer storage, you can choose to record PowerPoint on Mac or PC online. There are many online screen recording websites that allow you to record a presentation with video and audio easily. Here I’d like to show you how to record a PowerPoint presentation with audio and video using ScreenCapture.
ScreenCapture online screen recorder enables you to record screen with webcam at the same time. When you want to record a video on PowerPoint, it will fulfill your needs well. However, the free version will add a watermark to the recording and only save the recording as MP4 in HD quality. If you want to eliminate these limitations, you can choose to upgrade to the full version.
To record a presentation with video online:
Step 1. Open the PowerPoint presentation on your computer.
Step 2. Enable Microphone, Sound, and Webcam, and then click Start Recording.
Step 3. Choose Window and select PowerPoint. Afterward, click Share.
Step 4. When you are done, click Stop Sharing and go back to ScreenCapture to click Stop Recording.
Step 5. Preview the recorded video and click Download to save it to your computer.

Wrapping Up
Both SurFlex Screen Recorder and ScreenCapture are compatible with Windows and macOS. That means you can record your Presentation with audio and video on your Mac or PC freely using either of the tools. If you are going to record PowerPoint presentation with audio and video on Mac using Microsoft Office, you may not be able to capture the internal sound. If you want to screen record on Mac with internal audio, check the related guide for more details.
About the Author
You May Also Like
-
4 Easy Ways to Record Video in PowerPoint You Will Like
You will know how to record video on PowerPoint, either with or without audio and webcam, using 4 easy tips.
Myra Xian Updated on -
How to Record a Presentation on Google Slides: 5 New Ways
You will know how to record on Google Slides with audio and webcam using easy and proven ways. Apply any of them to capture screen.
Myra Xian Updated on -
How to Video Record Yourself Presenting a PowerPoint in 4 Ways
You will know how to video record yourself presenting a PowerPoint to record PowerPoint presentation with audio and video easily.
Myra Xian Updated on