

Updated on
Quick Answer:
You can record webcam on Mac using the built-in apps, including QuickTime, Photo Booth, and iMovie, or the third-party Mac screen recorder, SurFlex Screen Recorder.
Whenever you need to record webcam, either on a Mac or PC, there are built-in apps available, making it easy for you to record video on computer using a webcam or an integrated camera. Thus, when you want to record a webcam on a Mac, there are both pre-installed apps and third-party webcam recorders for you to choose from. If you want to record video on Mac with webcam but don’t know how to do it, check the tips below:
Table of contents
Record Webcam on Mac with QuickTime
The first Mac webcam recorder I’d like to detail is QuickTime, which is a popular choice for screen recording, audio recording, and webcam recording on macOS. When you record webcam on Mac with QuickTime, it enables you to record the visuals from the camera and the audio from your microphone. If you want to screen record on Mac with audio, QuickTime will be helpful.
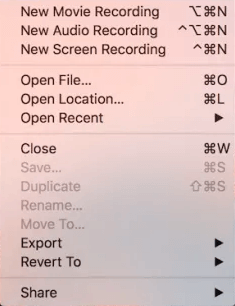
To record webcam on Mac with QuickTime:
Step 1. Open QuickTime Player on your Mac.
Step 2. Navigate to File > New Movie Recording.
Step 3. Adjust the window according to your preferences.
Step 4. Click the arrow icon in the control bar to select the camera, audio input, and video quality.
Step 5. Click Record to start recording a video on Mac using the webcam.
Step 6. Click the Stop button to end the video recording.
Step 7. Click File > Export As or Save, name the video recording, choose a destination folder, and then click Save to save the recorded video to your Mac.
If you want to record ascreen on your Mac with internal audio, check the guide on QuickTime screen recording with audio for more details.
Record Video on Mac via Webcam Using Photo Booth
Photo Booth is another pre-installed app on Mac that allows you to record video on Mac with webcam. As the Camera app on other devices, Photo Booth serves the functions of photo taking and video taking, either with the internal or external camera on your Mac.
Compared with QuickTime, Photo Booth has an advantage: allowing you to add a special effect to the recording, such as Mirror, Stretch, and Dent. If you want to record yourself on Mac with special effects, using Photo Booth will do you a favor.
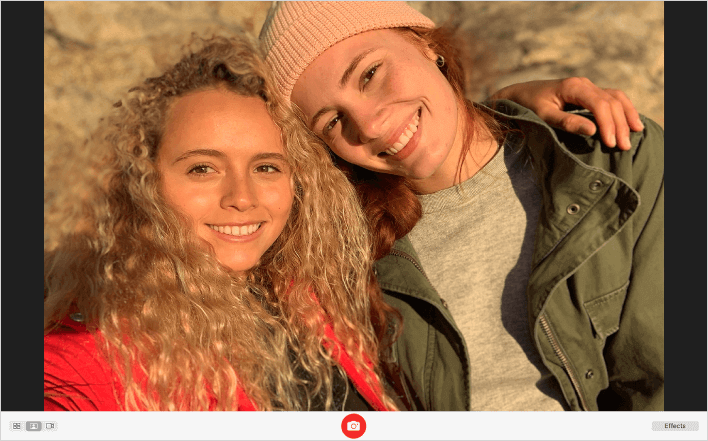
To record video on Mac via webcam:
Step 1. Search to open Photo Booth on your Mac.
Step 2. Click the video-taking icon to enable the recording mode.
Step 3. Click Effects and select a special effect you like.
Step 4. Click the red Record button to start the webcam recording for Mac.
Step 5. When you are done, click the Stop button to end the video-taking.
Record Video from Camera on Mac via iMovie
The last workable solution to record video from camera on Mac is using iMovie. Since macOS 12.6 and later, iMovie has been added with screen recording features, making it easy for you to record video from camera on Mac. Besides, since iMovie is primarily a video editor, you can not only record videos but also edit the recorded videos using this app. If you are going to record yourself on Mac, using iMovie is also a feasible choice.
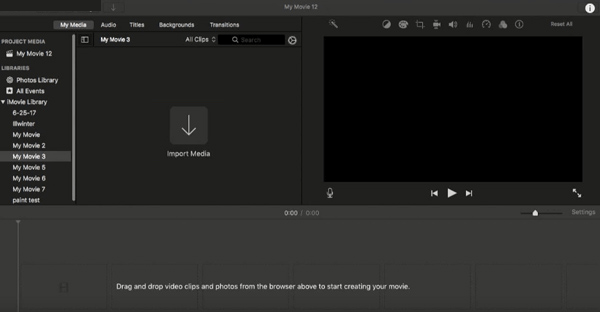
To record video from camera on Mac with iMovie:
Step 1. Open iMovie on your Mac.
Step 2. Go to File > Import Media and choose the built-in camera or external webcam as the input device.
Step 3. Click Record to start recording a video on Mac.
Step 4. When you are done, click Stop and edit the video if necessary.
Step 5. Save the recorded video to your Mac.
Record Screen and Webcam on Mac At the Same Time
If you only want to record a video of yourself, using one of the webcam recorder apps introduced above will fulfill your needs. However, if you are going to record screen and camera at the same time on Mac, it’s necessary to apply a third-party Mac camera recording tool like SurFlex Screen Recorder.
It enables you to record the full screen, any selected portion, a window, a webcam only, or the screen and webcam. Besides, it will capture the system sound, microphone sound, or both during the webcam recording. Whether you want to record webcam only or record screen with webcam at the same time on your Mac, SurFlex Screen Recorder will get it done easily.
Moreover, unlike the built-in apps that save recordings as MOV files. SurFlex Screen Recorder offers a wide range of video & video formats for you to choose from. If you want to customize the video output options, it makes it easy to do.
To record screen with webcam on Mac:
Step 1. Go to Settings to set up your recording preferences, choose the Record Screen mode, and then select the target screen, window, or region.
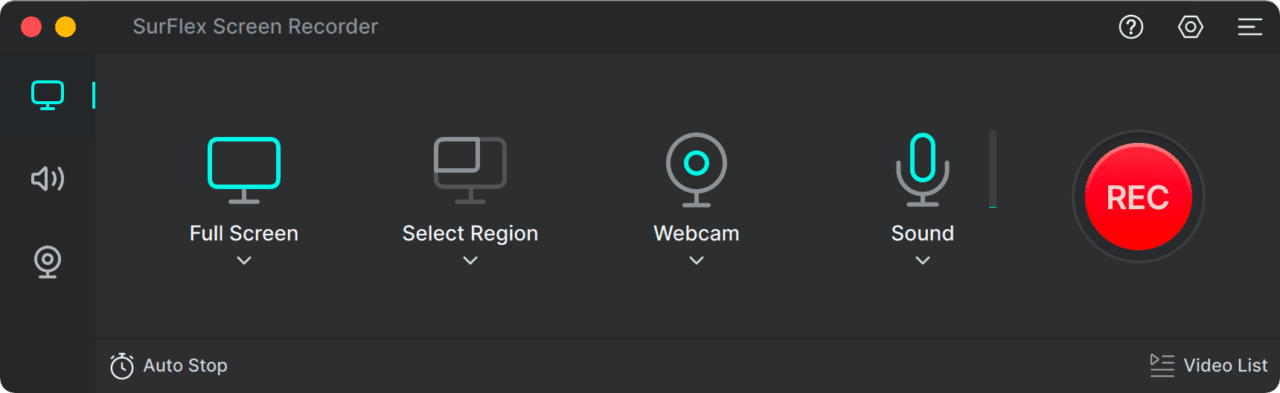
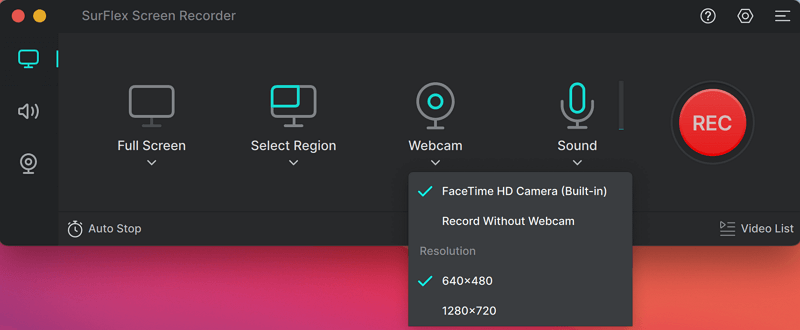
Step 2. Enable Webcam recording, select the camera, and choose a resolution. (The supported resolutions depend on the camera you use.)
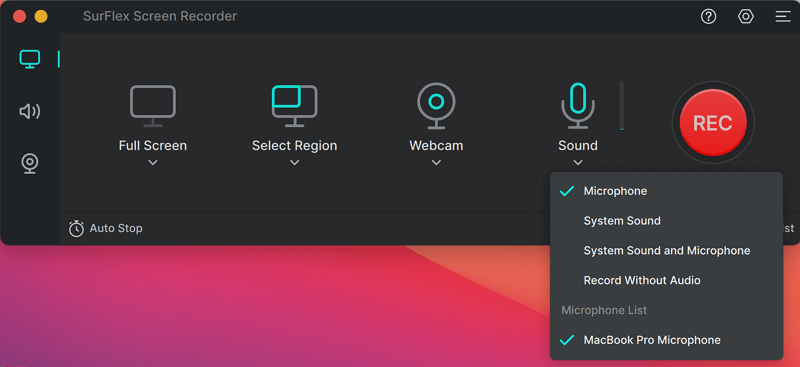
Step 3. Enable audio recording and choose the audio type. Afterward, click REC to start recording screen and webcam on Mac at the same time.
Wrapping Up
It’s easy to record video from a webcam on a Mac since there is more than one native webcam recorder to help. In addition to the desktop-based apps, there are also online services, including screen recorder websites and screen recording extensions, available for help. If you are interested in this method, try one of the services below:
- ScreenApp
- ScreenCapture
- Awesome Screenshot & Screen Recorder
- Loom Screen Recorder & Screen Capture
About the Author
You May Also Like
-
3 Free Ways to Record Webcam Video Online
Check the online webcam recorders here and use any of them to record webcam video online for free, without any limitations.
Myra Xian Updated on -
3 Ways to Record PowerPoint Presentation with Webcam
Whether you are using a Mac or PC, you can use the three easy ways below to record PowerPoint Presentaion with webcam with ease.
Myra Xian Updated on -
2 Ways to Record Video with Blurred Background
Check this guide and you will know how to record video with blurred background on your PC or Mac without difficulty.
Myra Xian Updated on