

Updated on
Quick Answer:
You can record screen in Windows 10 without any software using:
1. Built-in Xbox Game Bar
2. ScreenCapture.com
3. Awesome Screenshot & Screen Recorder extension
If you want to screen record on Windows 10 but don’t want to download and install extra apps to take up your computer storage, check the tips below to learn how to record screen in Windows 10 without any software using free and easy ways.
Table of contents
How to Record Screen in Windows 10 Without Any Software Directly
Tool: Built-in Xbox Game Bar
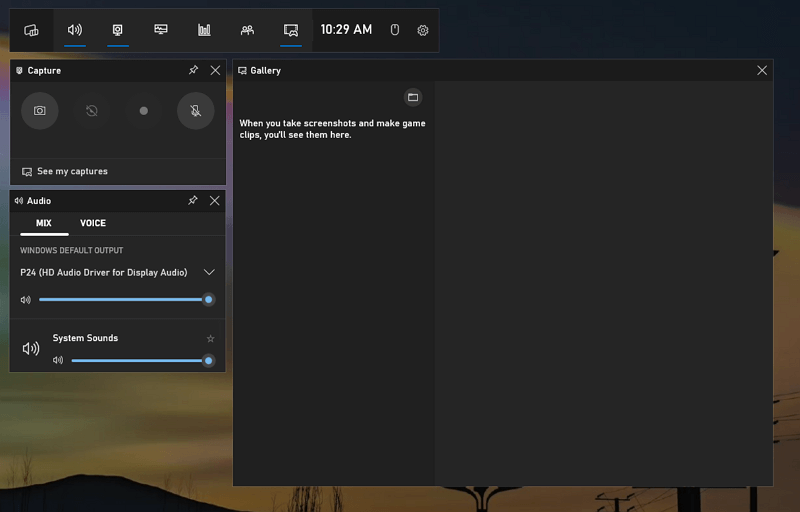
Whenever you need to record screen on Windows 10, you don’t necessarily need a third-party screen recorder since there is a pre-installed screen recorder on Windows 10 that allows you to record screen on Windows with audio without any software – Xbox Game Bar.
Xbox Game Bar recording enables you to record a window of a game or app with audio, including various kinds of internal audio and external audio. Thus, when you want to screen record on Windows 10 with audio, using Xbox Game Bar is an effective choice.
However, it can’t record full screen on Windows and can’t capture the File Explorer window. If you need to record your desktop or a selected portion of your screen, it won’t get your needs met. If you want to screen record on Windows without Game Bar, check the related guide for more workable tips.
To record screen on Windows 10 without any software:
Step 1. Press Windows + Alt + R to start recording the Windows 10 screen immediately.
Step 2. Click the Stop icon in the control bar to end the recording.
Step 3. Press Windows + G to open Xbox Game Bar, open the Gallery panel, and then you can check and preview your recording here.
How to Record Screen in Windows 10 Without Any Software Online
Tool: ScreenCapture
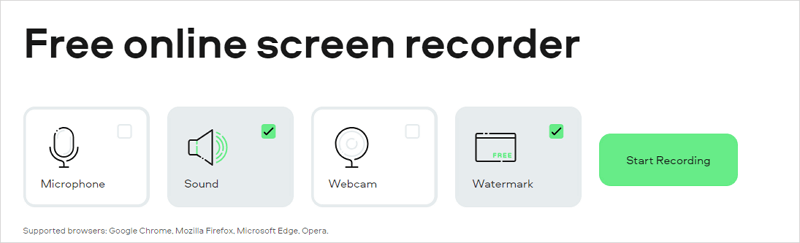
If Xbox Game Bar screen recording can’t fulfill your needs, you can consider using an online screen recorder for Windows 10, such as ScreenCapture, to record screen in Windows 10 without any software for free.
ScreenCapture is a free online screen recorder that helps to record a browser tab, a window, the entire screen, and the webcam, either with or without audio. The free version will save the recordings as MP4 files in HD quality.
The downside is that it will add a watermark to your recorded video. If you don’t want it, you can upgrade to remove the watermark.
To record screen in Windows 10 without any software online:
Step 1. Visit ScreenCapture.com.
Step 2. Set up the video and audio input and click Start Recording.
Step 3. Choose a tab, window, or full screen to record and click Share.
Step 4. When you need to end the recording, click Stop Sharing and go back to ScreenCapture to click Stop Recording.
Step 5. Preview the recording and click Download to save the recording to your Windows 10 computer.
How to Record Screen in Windows 10 with Audio Without Any Software via Browser
Tool: Awesome Screenshot & Screen Recorder
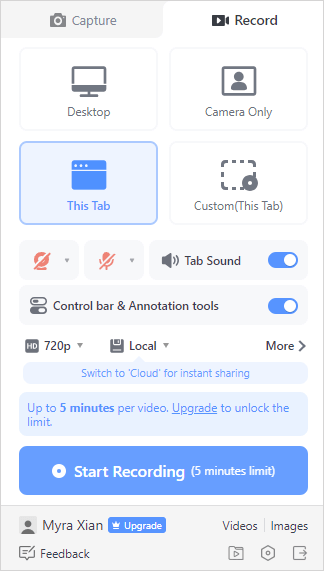
You can also use a screen recording browser extension to record screen on Windows 10 without any software. There are many choices, such as Awesome Screenshot & Recorder, Loom, and Nimbus Screenshot & Screen Video Recorder. All allow you to record screen on Windows with audio without any software.
If you prefer to use a screen recorder extension, it’s advisable to upgrade to its pro version since the free version has limited functionality. For example, you can record at most five minutes at a time, which may not be able to fulfill your needs.
Here I’d like to show you how to record screen in Windows 10 without any software using Awesome Screenshot & Screen Recorder.
To record screen in Windows 10 with audio without any software via a browser:
Step 1. Add the screen recorder to your browser and pin it to your toolbar.
Step 2. Sign in and finish the basic settings.
Step 3. Click the icon of the screen recorder and set up the recording settings.
Step 4. Choose a recording mode and click Start Recording.
Step 5. When you need to stop, click the icon of the screen recorder in the toolbar and click Stop.
Step 6. Click Download to save the recording to your computer.
Wrapping Up
If you want more advanced features while recording screen on Windows, you may still need a screen recorder app for Windows. Why? A desktop-based tool generally has more features and thus is more powerful. For example, SurFlex Screen Recorder allows you to customize the recording region, video quality, audio quality, and more, making it easy for you to capture videos as you like. Given that, it’s advisable to use professional screen recording software if you need to record screen on Windows often.
About the Author
You May Also Like
-
How to Screen Record on Gateway Laptop in 3 Ways
You will know how to screen record on Gateway laptop in various Windows versions using either built-in or third-party screen recorder tools.
Myra Xian Updated on -
How to Screen Record Apple Music on Any Device
If you are wondering how to screen record Apple on your iPhone or computer, check this guide and you will know how to do it.
Myra Xian Updated on -
How to Record Discord Video Calls on Any Device
You will know how to record Discord video calls on your computer or mobile using different tools, either free or paid.
Myra Xian Updated on