

Updated on
Quick Answer:
You can record in HD with OBS by selecting 1280×720 as the output resolution and setting up other recording options properly. Afterward, you can use OBS to record any content you need in 720p.
OBS Studio is a highly popular screen recording software due to its combination of being free, open-source, and powerful. However, because of its diverse range of features and numerous customization options, you may not be familiar with how to correctly configure OBS settings to record your desired video. In this guide, I will show you how to make OBS record in HD, a common request among many users. If you are interested in achieving this, continue reading to find the detailed step-by-step instructions. Afterward, you can use OBS to record gameplay, capture a browser tab, or record the entire screen with ease.
Table of contents
How to Make OBS Record in HD
If you are going to record HD video with OBS, be it 30fps or 60fps, you need to properly set up the recording settings so that you can successfully record a high-quality video with OBS. Here are the OBS 720p recording settings:
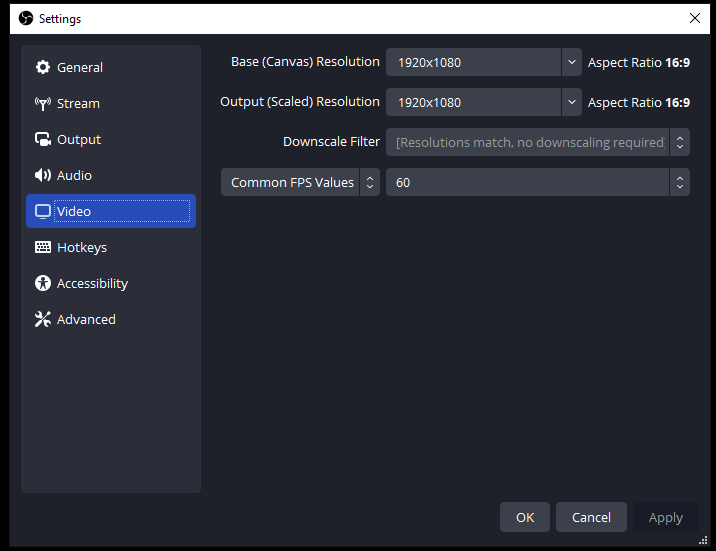
- Go to File > Settings > Video and set both the Base Resolution and Output Resolution to 1280×720. Then, set the Common FPS Value to either 30 or 60. (30fps is suitable for most types of content, while if you are recording a video with high movement, such as gameplay, it is recommended to choose 60fps for better video quality. After these settings, click Apply.
- Switch to the Audio tab, disable all options in the Global Audio Devices section so that you can solely capture the audio source you choose, and then hit Apply.
- Navigate to the Output tab, select Output Mode as Simple, and then proceed to the Recording section. Choose your preferred video format and set the Audio Track to 1. Regarding the Video Encoder, if you have an NVIDIA graphics card, select the option related to NVIDIA; otherwise, choose x264. Click Apply.
Once you finished these settings, click OK to save the changes. If you want to screen record on OBS in 1080p next time, you can refer to the guide on how to record 1080p with OBS for details.
How to Record in HD with OBS
Now you know how to get OBS to record in HD. You can follow the next part to learn how to record a video with OBS in HD quality.
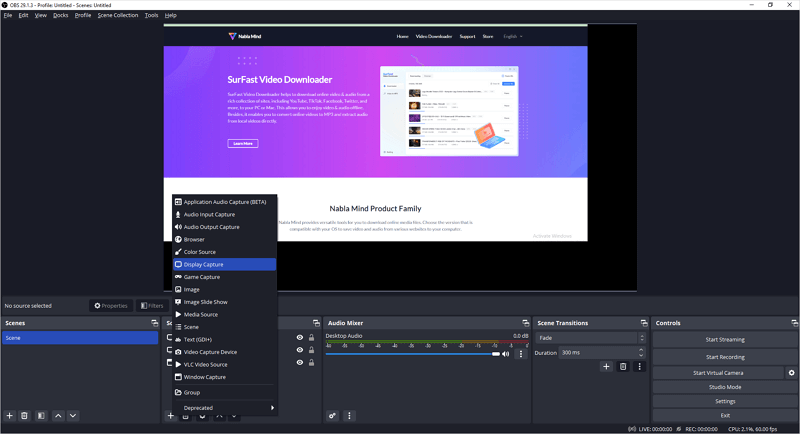
Step 1. Head to the Sources panel.
Step 2. Click the plus icon to add the recording sources you need, such as Windows Capture for a specific game, Display Capture for full screen, Audio Output Capture for sound coming from your computer, and more.
Step 3. Set up the recording sources according to your needs.
Step 4. When you are ready, click Start Recording to start capturing the content you need.
Step 5. When needed, click Stop Recording and go to File > Show Recordings to check the HD video.
Wrapping Up
The specific settings may vary slightly depending on your hardware. You can adjust some of them based on the device you are using. Additionally, it’s worth noting that OBS saves recordings in the MKV format by default. If you prefer to make OBS record in MP4, the most widely used video format, you will need to change this setting in the OBS Settings as well.
About the Author
You May Also Like
-
4 Ways to Record Google Earth Easily
You will know how to record Google Earth on your device to capture a Google Earth touring for sharing or other purposes.
Myra Xian Updated on -
How to Record Part of Screen on Windows 10 in 3 Ways
You will know how to record part of screen on Windows 10 or other Windows versions using easy and powerful screen recorders for Windows.
Myra Xian Updated on -
How to Screen Record on Dell Desktop in 4 Ways
You will know how to screen record on Dell desktop in four easy and tested ways. Pick up the Dell screen recorder you like to apply.
Myra Xian Updated on